GPU Server SSH Tutorial
For machine learning applications, Prof. Charles Wang left our class a 2017 Titan Xp GPU Server for training. Training machine learning models can be extremely time consuming and resource gating for personal computers. Not to mention, machine learning libraries such as Tensorflow, are optimized for NVidia Cuda cores. Developing on remote machines in the past used to be a pain, but now with IDEs like VSCode, we can work on code on remote servers as if they were running on our personal machines. To do this we will need to complete the following steps.
- Create an
.ssh/configfile with all of Temple's servers that we wish to tunnel through. - Create an ssh key and add it to each server so that we don't need to type in a password everytime we change code.
- git clone your project on the
cis-wangstu1server using another ssh key so that we can commit and push code to GitHub without personal access tokens. - Setup VSCode for remote code editing.
1. SSH config file
On your Mac or Linux PC, open up your terminal and run the following command (unless you already have an .ssh/config file.)
touch ~/.ssh/config
This command creates an empty config text file. Next we will populate it with the list of Temple Servers.
Use nano or any text editor you prefer to copy and paste the following.
Host cis-linux2.temple.edu
  HostName cis-linux2.temple.edu
  User tul20076
  IdentityFile ~/.ssh/id_rsa

Host tec2.hpc.temple.edu
  HostName tec2.hpc.temple.edu
  User tul20076
  IdentityFile ~/.ssh/id_rsa

Host wang
  HostName cis-wangstu1
  ProxyJump cis-linux2.temple.edu
  User tul20076
  IdentityFile ~/.ssh/id_rsa
Of course replace your User name with your AccessNet name.
Next, notice that we have an IdentityFile listed in the config file. This is the path to our ssh key, but we haven't actually created this yet. We do this by running ssh-keygen.
2. Create SSH Key and add it to each server.
ssh-keygen
Generating public/private rsa key pair.
Enter file in which to save the key (/Users/thanhnguyen/.ssh/id_rsa):
You can skip all of the steps by hitting enter.
Generating public/private rsa key pair.
Enter file in which to save the key (/Users/thanhnguyen/.ssh/id_rsa):
Enter passphrase (empty for no passphrase):
Enter same passphrase again:
Your identification has been saved in /Users/thanhnguyen/.ssh/id_rsa.
Your public key has been saved in id_rsa.pub.
The key fingerprint is:
SHA256:kxdpmge4naR5MduBlrGu5ndLACgQ5sL6VpgkjuTz81A [email protected]
The key's randomart image is:
+---[RSA 3072]----+
|oo      .        |
|+.   . . = .     |
|o+o . o X =      |
|Bo +   X % o     |
|o+o .E+ S +      |
| .o..  o =       |
|  o+  o   .      |
| .  +o  ...      |
|     ... ...     |
+----[SHA256]-----+
If you are on MacOS Ventura or above you'll need to edit your Mac's ssh config file using sudo privlages. See OSXDaily's How to Fix SSH Not Working on MacOS Ventura.
Now we need to copy this key to each server, this part is tedious, but worth it. We need to run ssh-copy-id on cis-linux2, and cis-wangstu1 in that order.
If you already have an SSH key setup from the 3296 Software Design course, you can just use that one and copy it to cis-wangstu1.
You'll be prompted to enter your password after running each command.
ssh-copy-id -i ~/.ssh/id_rsa.pub cis-linux2.temple.edussh-copy-id -i ~/.ssh/id_rsa.pub tec2.hpc.temple.edussh-copy-id -i ~/.ssh/id_rsa.pub wang
You should now be able to freely ssh into each server without a password. Try it!
Now lets clone the project repository on cis-wangstu1.
3. git clone the repo on the GPU Server
First we need to ssh into cis-wangstu1.
ssh wang
You should see the following to know that you are logged into the correct server.
#######
#       #    # #####  ######  ####  #####    ##### #    # ######
#        #  #  #    # #      #    #   #        #   #    # #
#####     ##   #    # #####  #        #        #   ###### #####
#         ##   #####  #      #        #        #   #    # #
#        #  #  #      #      #    #   #        #   #    # #
####### #    # #      ######  ####    #        #   #    # ######

#     #
#     # #    # ###### #    # #####  ######  ####  ##### ###### #####
#     # ##   # #       #  #  #    # #      #    #   #   #      #    #
#     # # #  # #####    ##   #    # #####  #        #   #####  #    #
#     # #  # # #        ##   #####  #      #        #   #      #    #
#     # #   ## #       #  #  #      #      #    #   #   #      #    #
 #####  #    # ###### #    # #      ######  ####    #   ###### #####
Next we will create another ssh key that will be used to clone the GitHub repository securely.
ssh-keygen
Generating public/private rsa key pair.
Enter file in which to save the key (/Users/thanhnguyen/.ssh/id_rsa):
You can skip all of the steps by hitting enter.
Generating public/private rsa key pair.
Enter file in which to save the key (/Users/thanhnguyen/.ssh/id_rsa):
Enter passphrase (empty for no passphrase):
Enter same passphrase again:
Your identification has been saved in /Users/thanhnguyen/.ssh/id_rsa.
Your public key has been saved in id_rsa.pub.
The key fingerprint is:
SHA256:kxdpmge4naR5MduBlrGu5ndLACgQ5sL6VpgkjuTz81A [email protected]
The key's randomart image is:
+---[RSA 3072]----+
|oo      .        |
|+.   . . = .     |
|o+o . o X =      |
|Bo +   X % o     |
|o+o .E+ S +      |
| .o..  o =       |
|  o+  o   .      |
| .  +o  ...      |
|     ... ...     |
+----[SHA256]-----+
You'll need to copy your public key to your clipboard.
- using pbcopy
- using cat
pbcopy < /Users/YOUR_USER_DIRECTORY/.ssh/id_rsa.pub
cat /Users/YOUR_USER_DIRECTORY/.ssh/id_rsa.pub
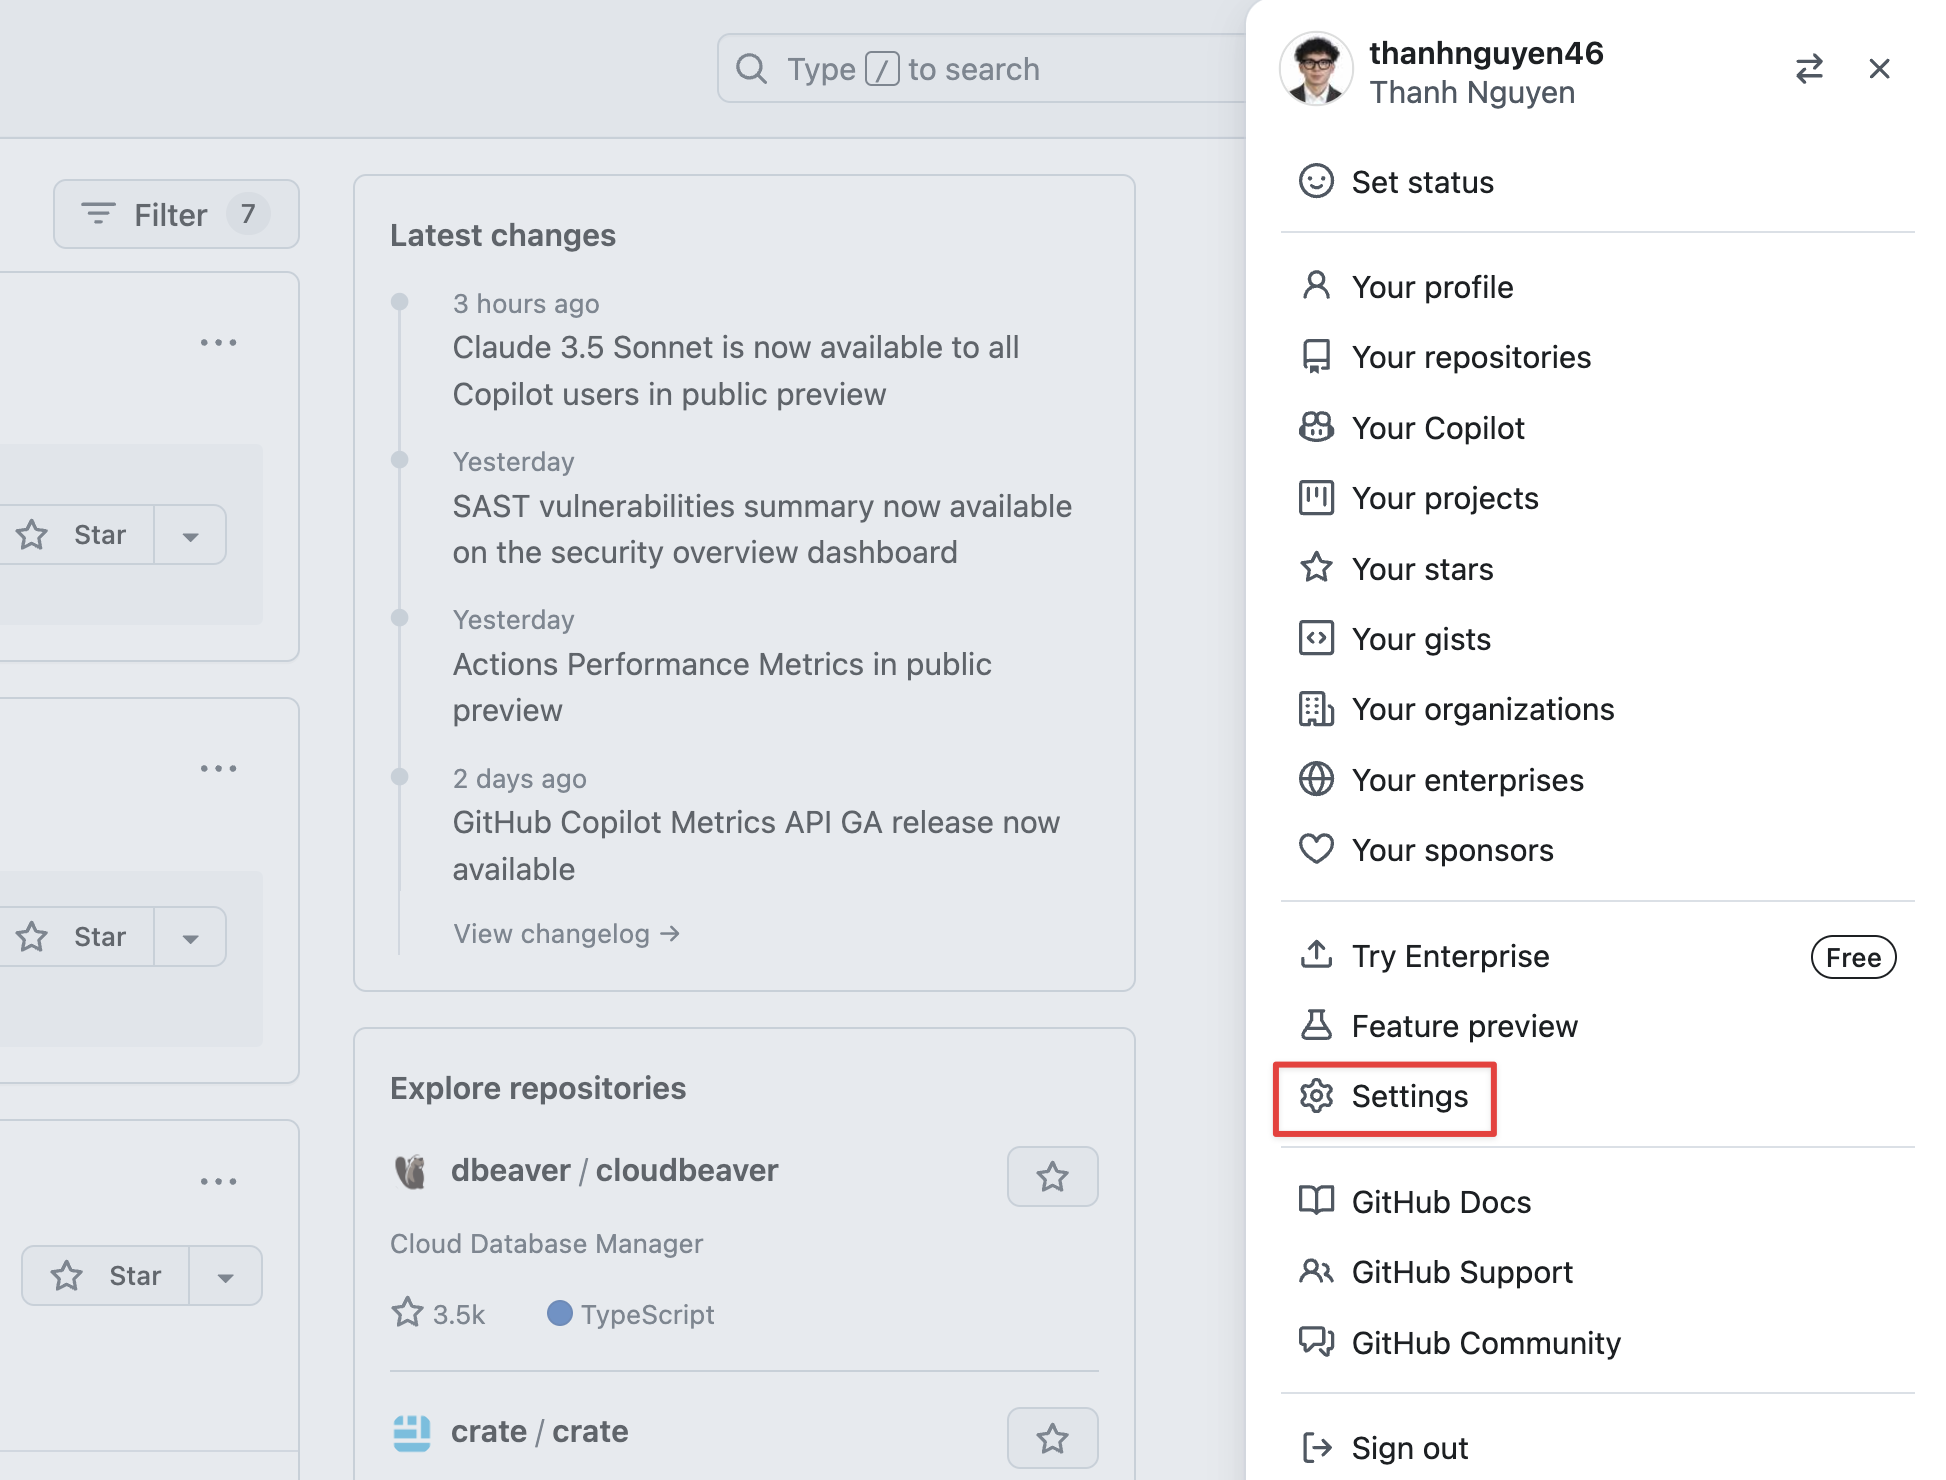
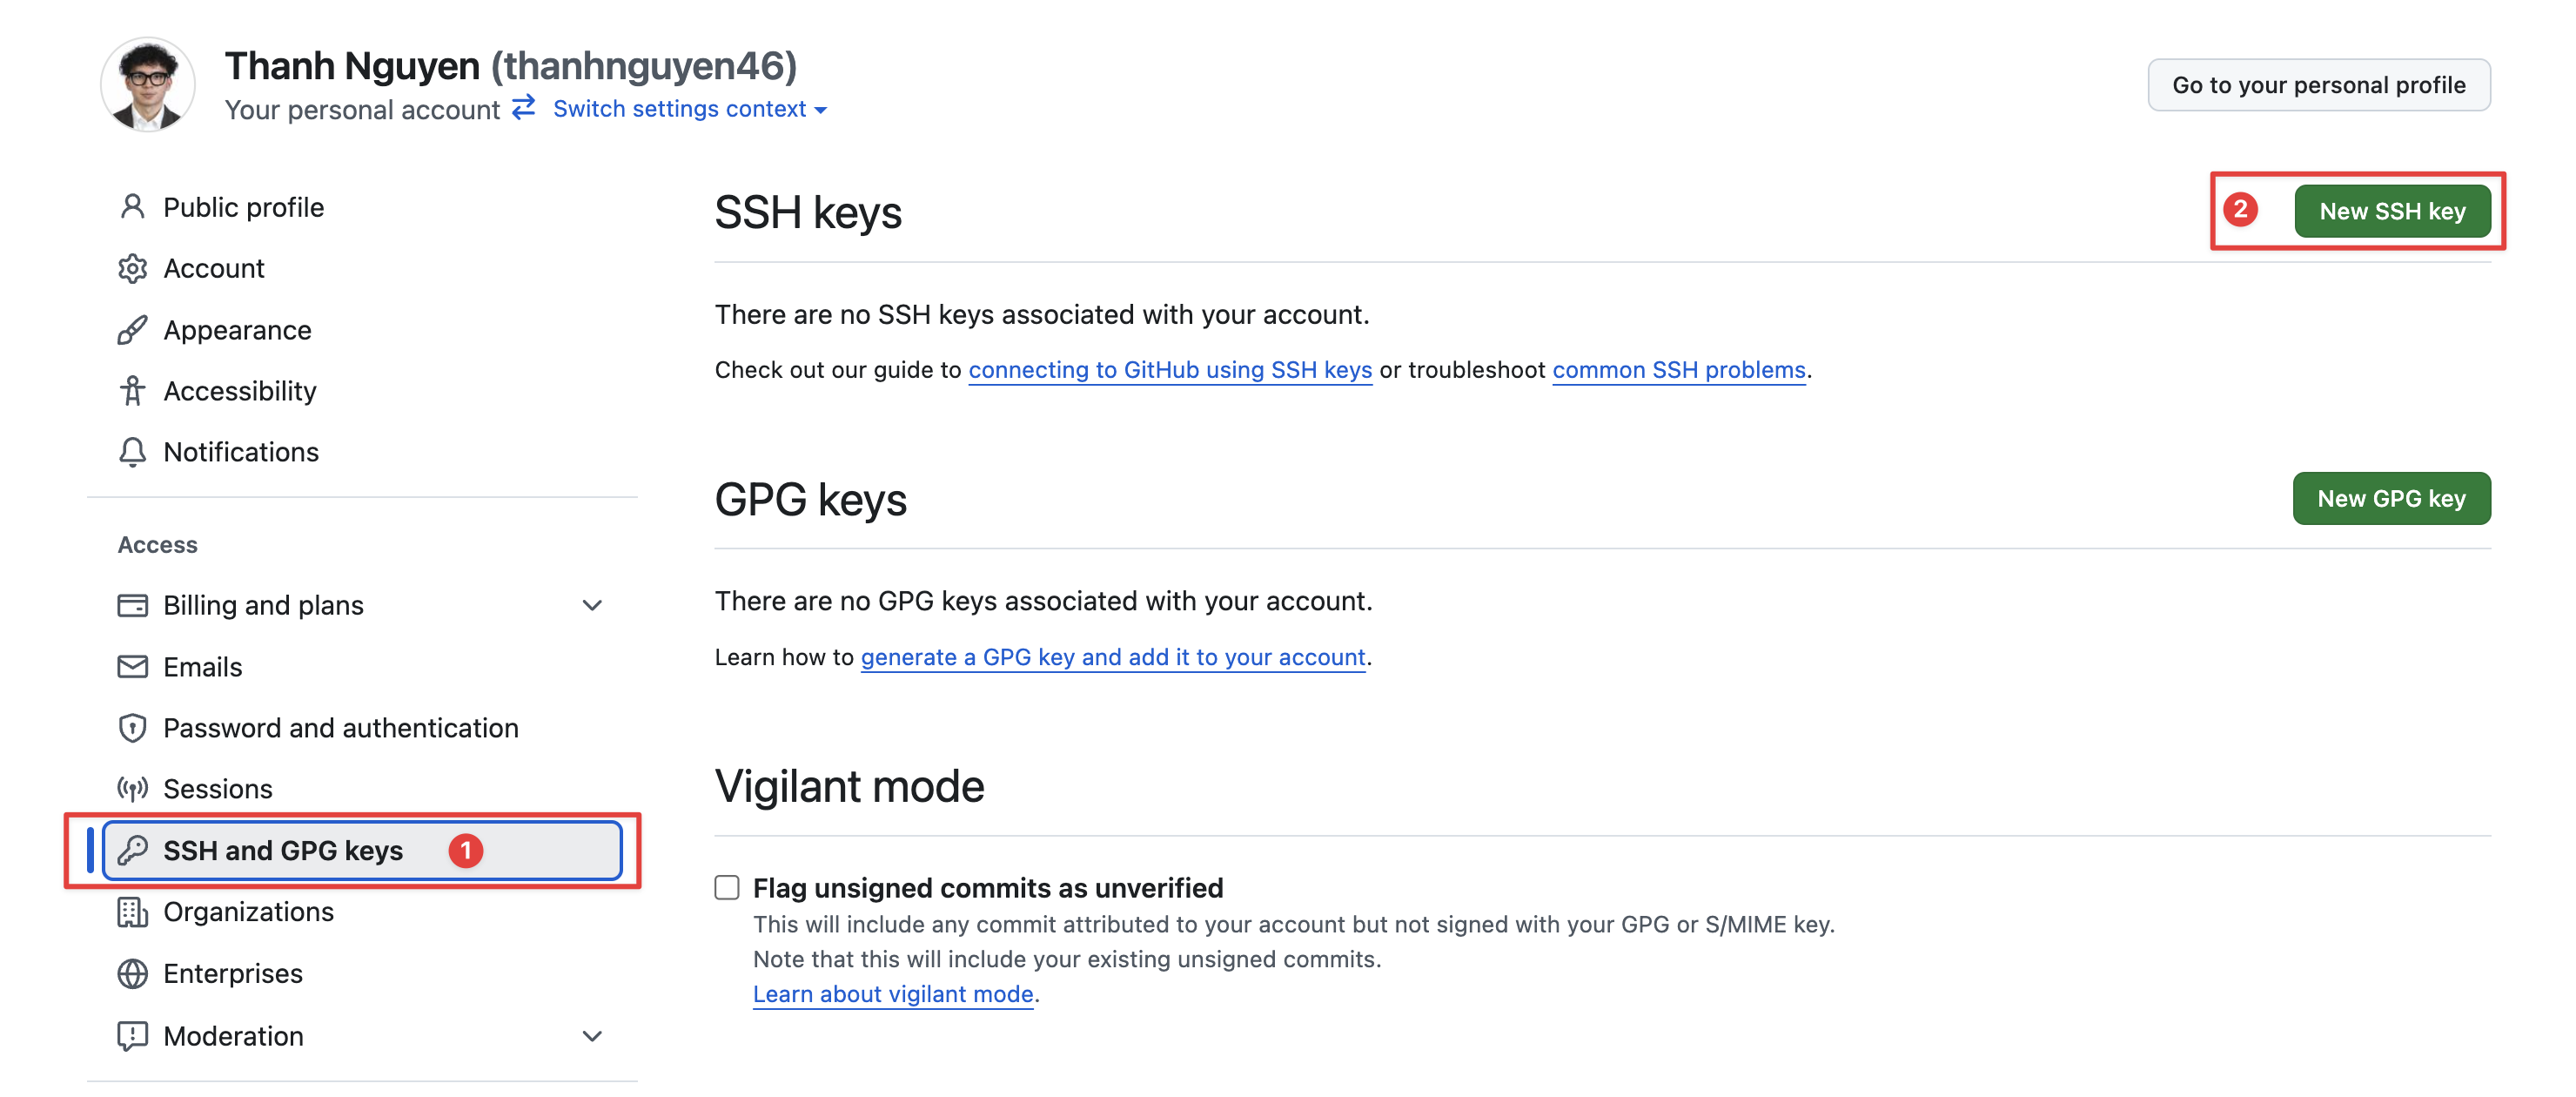
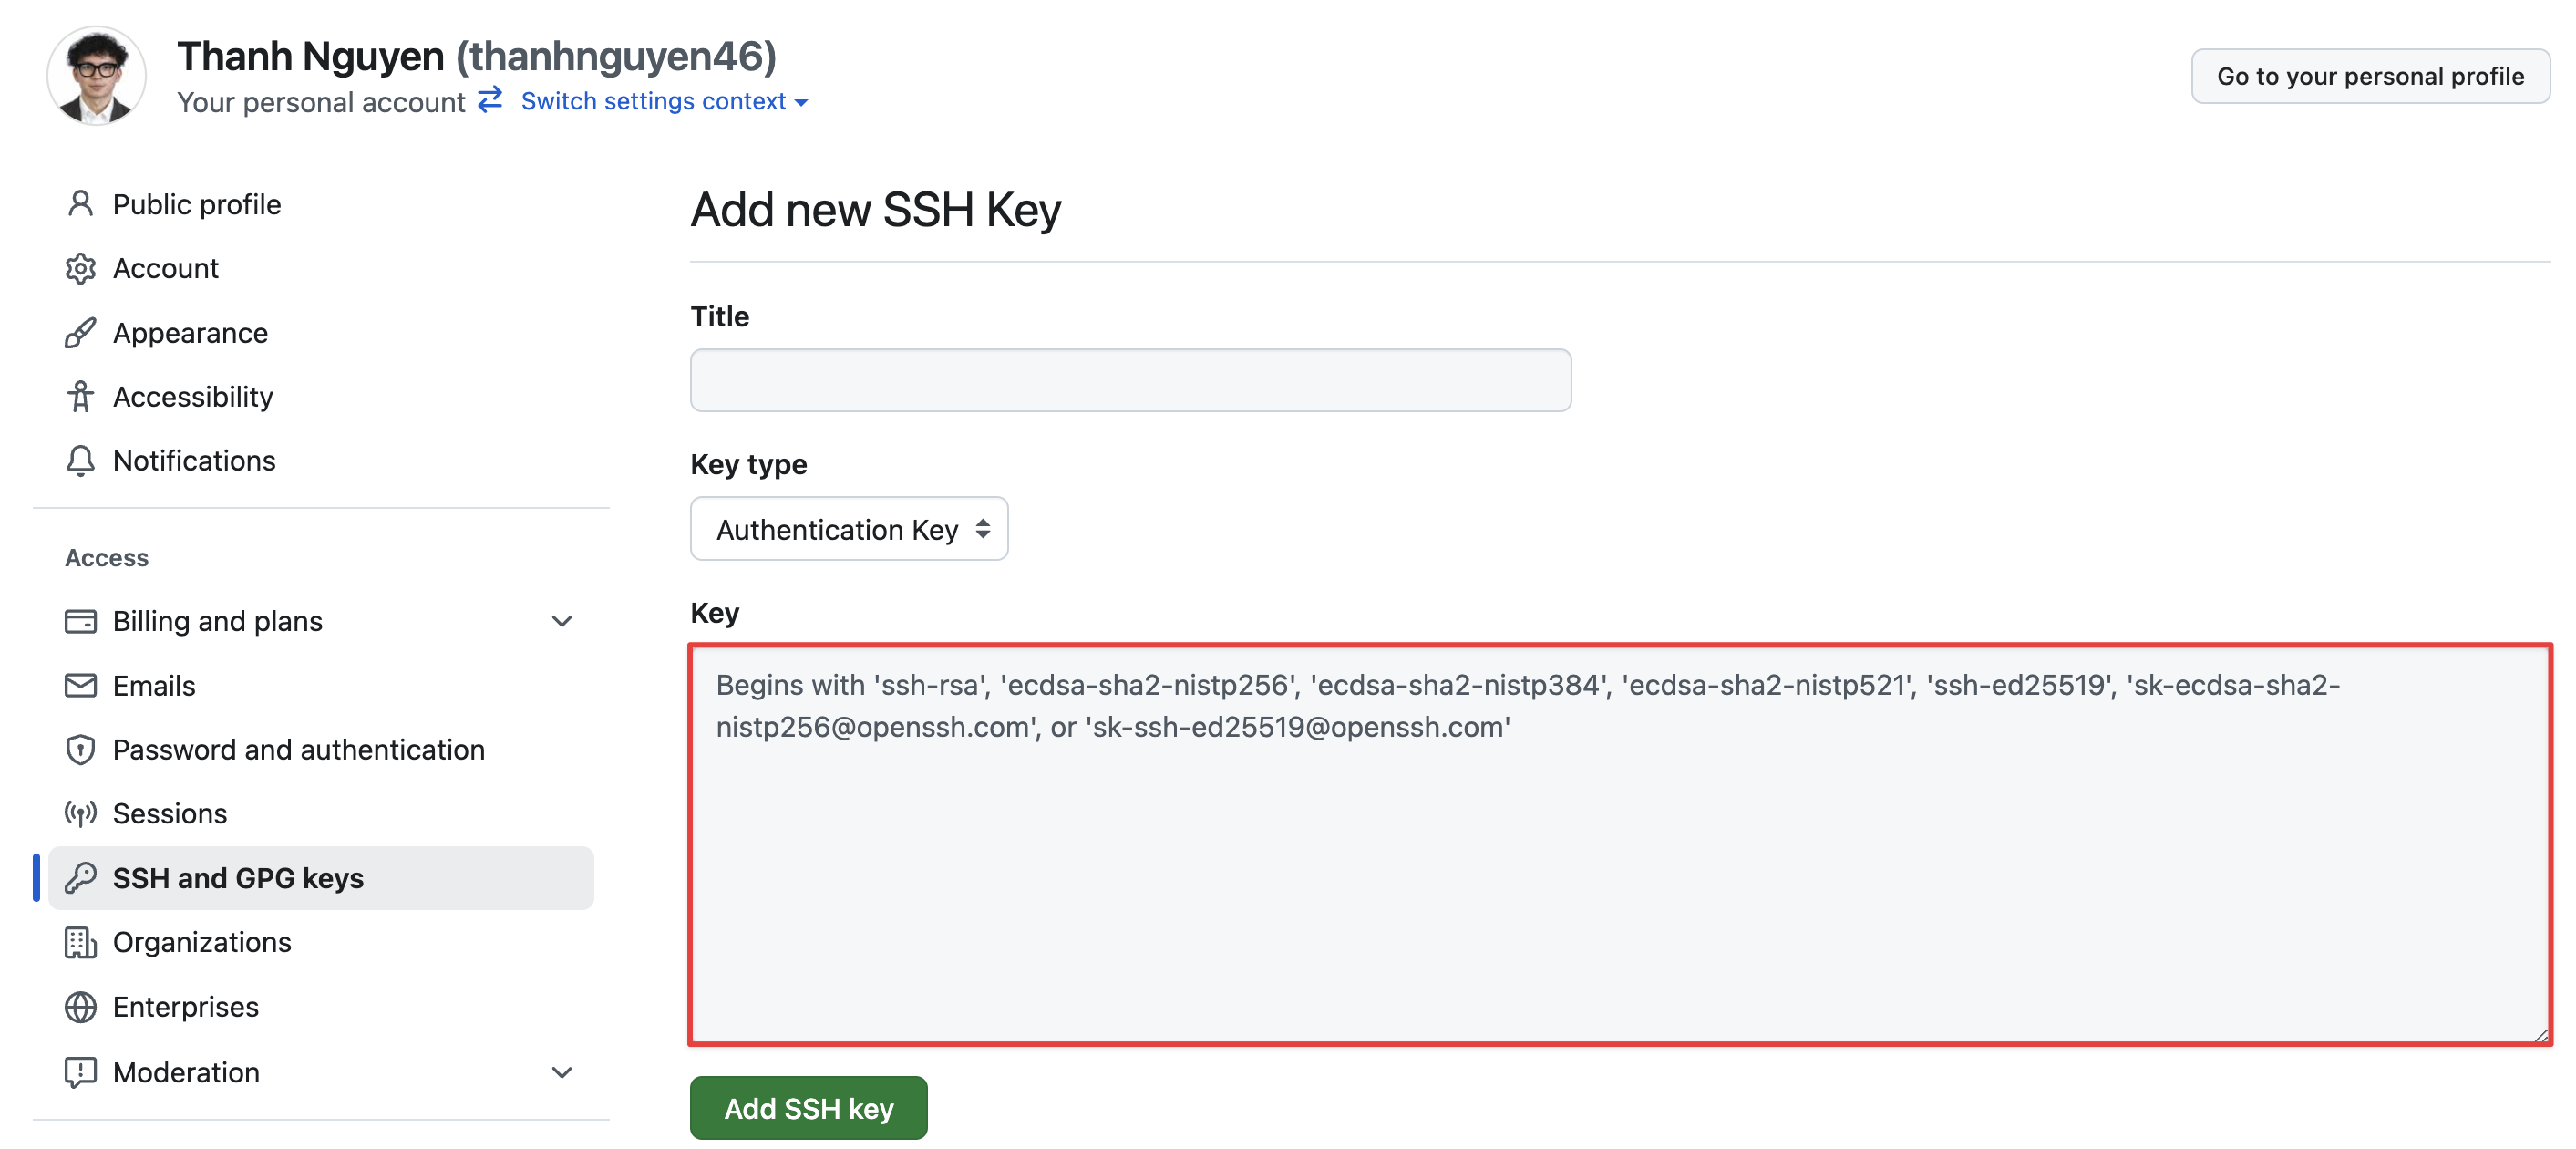
With your public key copied to your clipboard login to https://github.com Tap on your profile in the top right corner as seen in Figure 1.1 and click Settings. You will then navigate to the SSH and GPG Keys menu on the Settings page. click "New SSH Key" and paste your public key that should be on your clipboard.
You may now clone your projects using SSH.
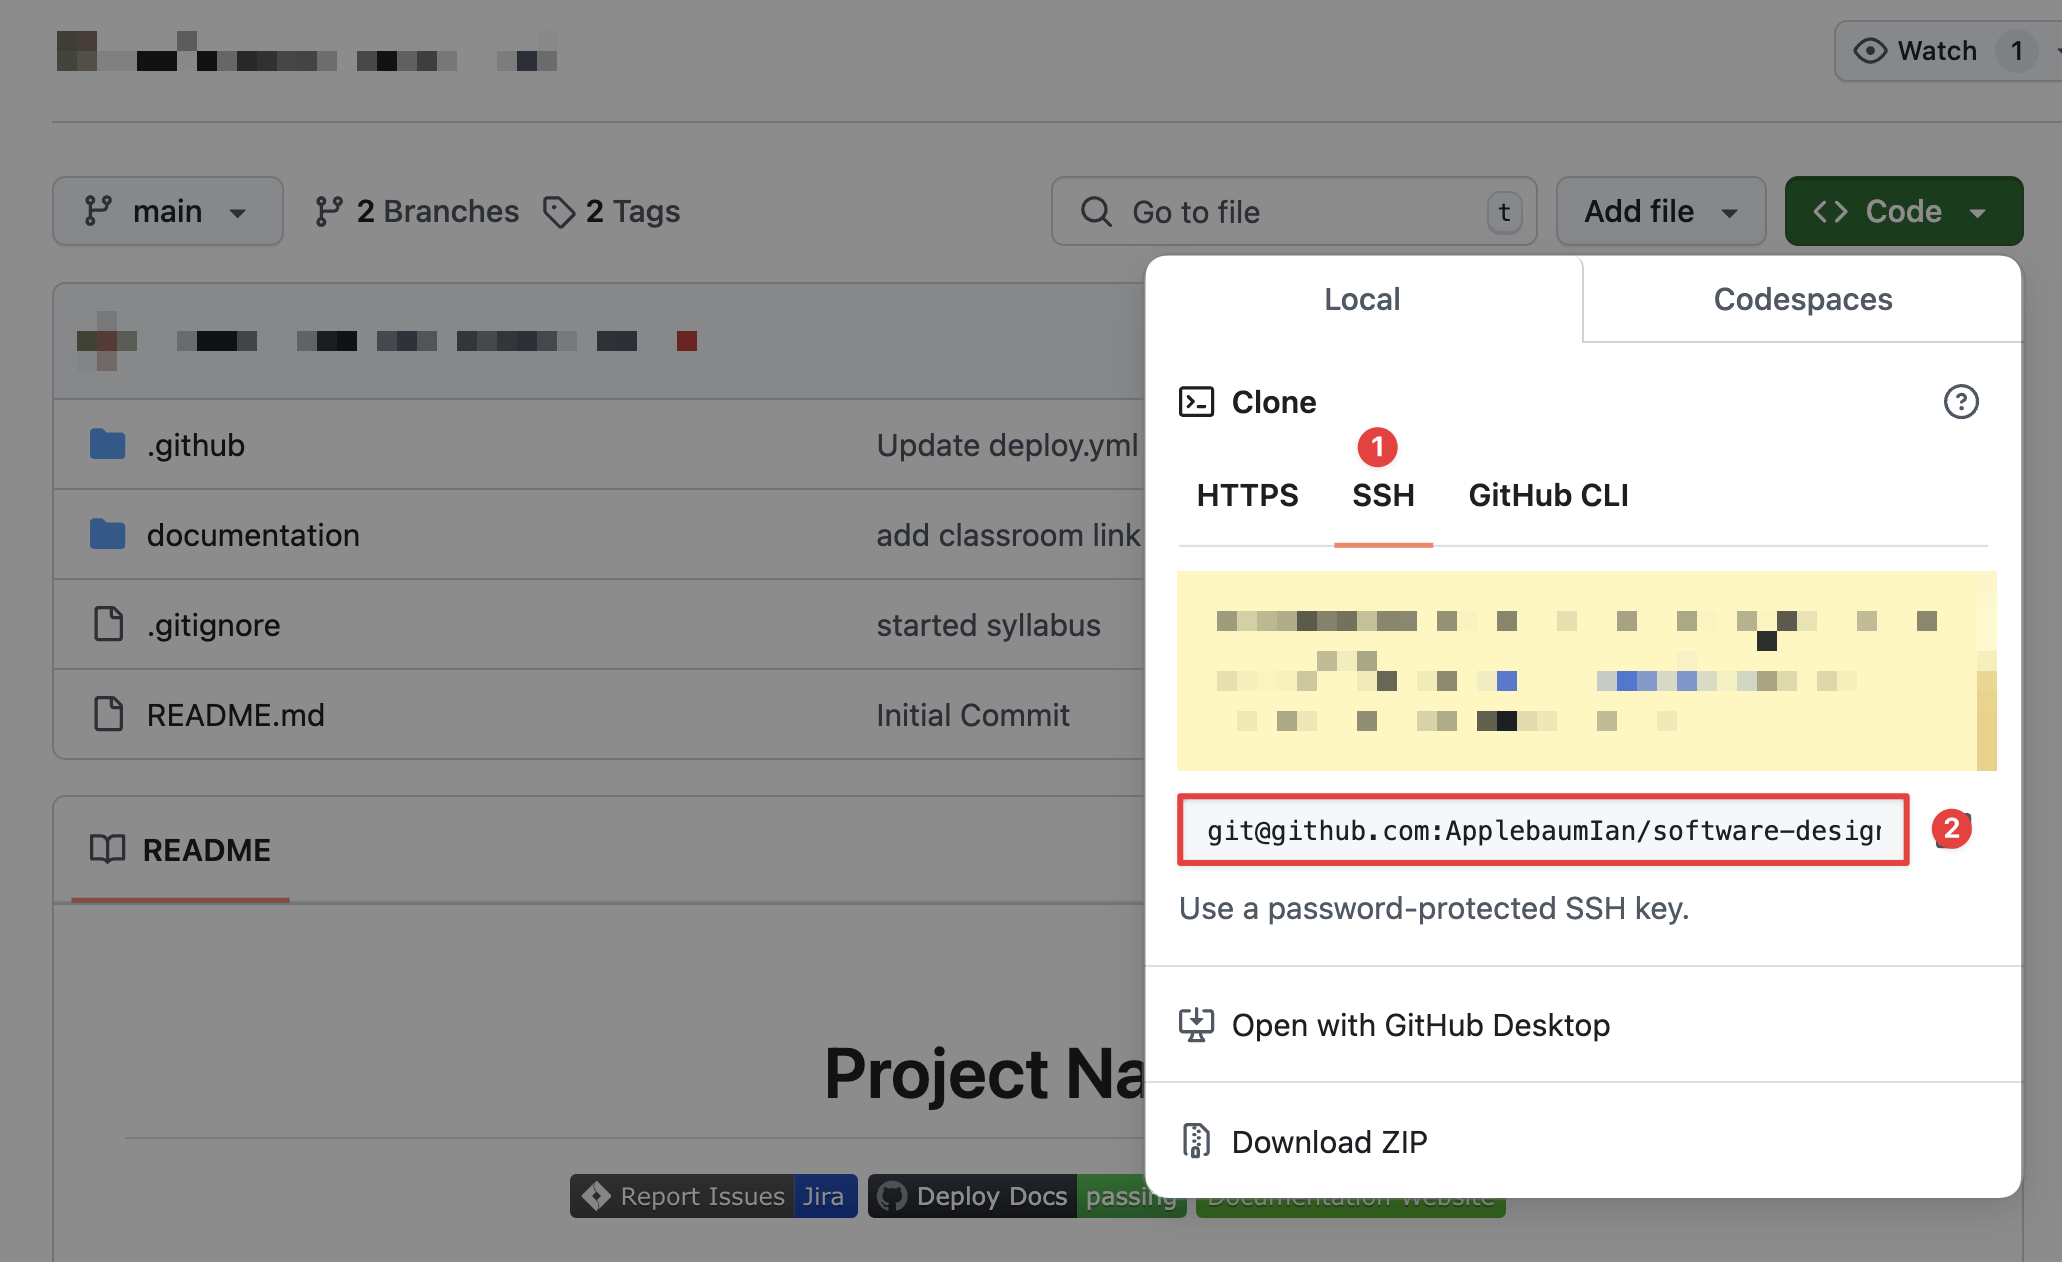
git clone [email protected]:Capstone-Projects-2023-Spring/project-YOUR-PROJECT.git
4. VSCode Remote Code editing
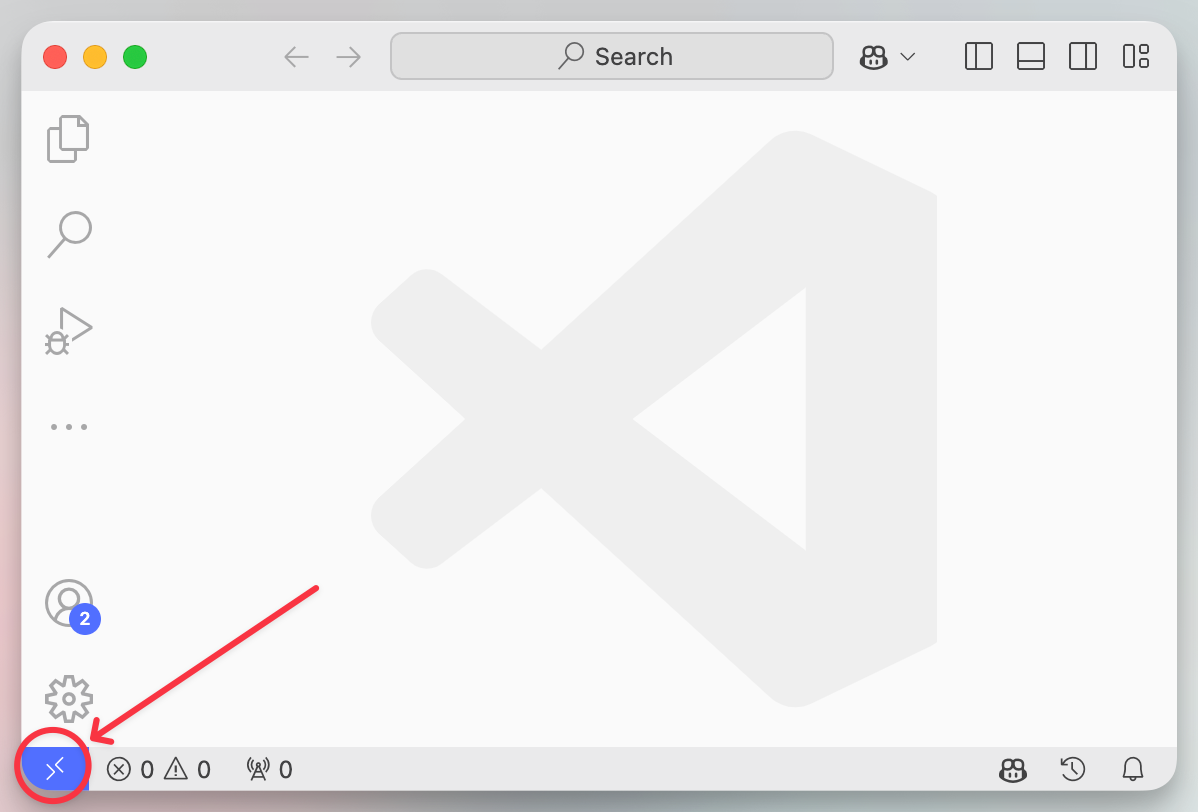
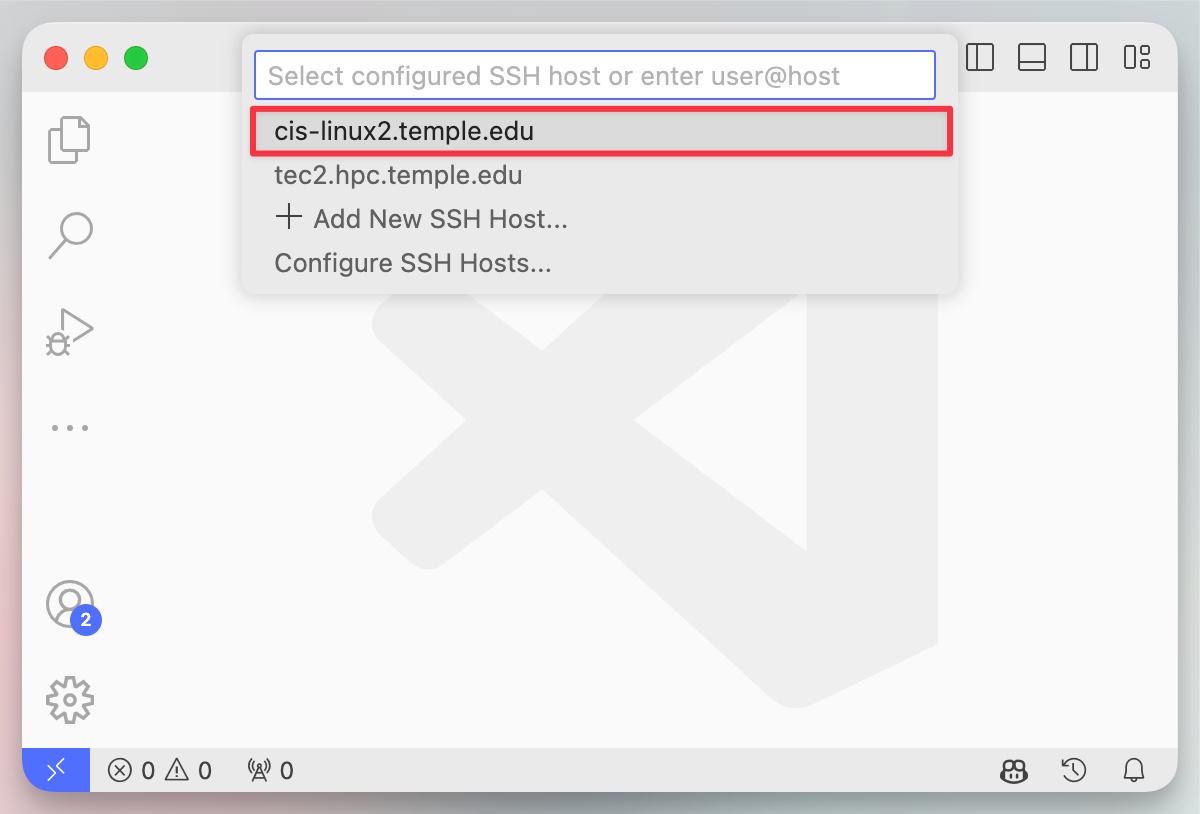
In VSCode, install the "Visual Studio Code Remote – SSH" extension by Microsoft. Once installed you will then use it to connect to the GPU Server by clicking the bottom left corner as seen in Figure 2.1, and then clicking wang from the list of connections as seen in Figure 2.2 (please note in the image it shows chinook not wang).
You should now be able to clone and open folders on the server using the VSCode interface. 👨💻